If you’re a seasoned DIY enthusiast, you already know the irreplaceable value of a cordless drill. But if you’re just stepping into the do-it-yourself world, let me underline just how crucial this tool can be – a lesson I learned the hard way.
I still remember my first major DIY challenge after moving out of my parents’ house. Tasked with assembling an array of IKEA furniture, I was armed with nothing but determination and an allen key. Hours of twisting and turning left my fingers bruised, my spirit dampened, and the job unfinished. In desperation, I picked up a random, inexpensive drill, thinking any tool would do the job. Unfortunately, I quickly learned that not all drills are created equal. The drill head wore off in no time, rendering my impulsive purchase a regrettable one.
But the real test came when I had to repair my leaking deck roof, damaged by a sudden hailstorm (story for some other time). It was then that I realized the importance of not just having a cordless drill but also having the right one. This experience sparked my journey into researching and understanding the world of cordless drills, which I’m about to share with you.
Understanding a Cordless Drill
The Heart of Many DIY Projects
The cordless drill reigns supreme as one of the most versatile and essential tools in any home toolkit. Whether you’re assembling furniture, hanging pictures, or embarking on a full-scale home renovation project, understanding how to use a cordless drill effectively can transform your DIY experiences from daunting to delightful.
What Is a Cordless Drill?
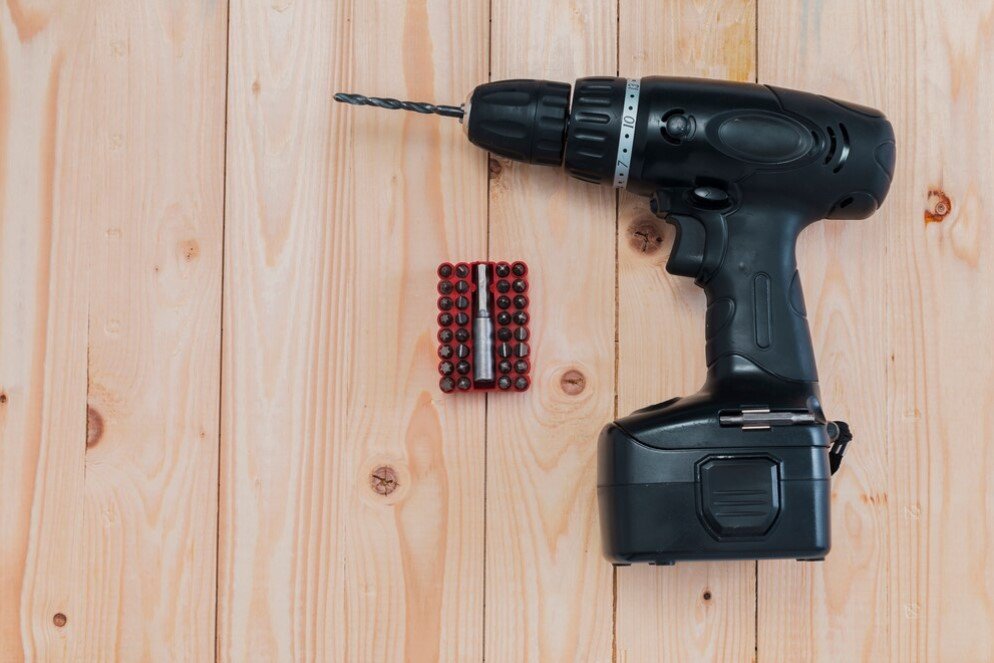
A cordless drill is an electric drill which operates on rechargeable batteries. It eliminates the need for a power outlet, offering the freedom to work anywhere. This tool is not only used for drilling holes in various materials, including wood, metal, and plastic but also doubles as a powerful screwdriver, thanks to its rotating chuck that can hold drill bits for drilling and driver bits for screwing.
Key Components of a Cordless Drill
- Battery: The power source, usually lithium-ion, which is known for long life and quick charging.
- Chuck: The clamp at the drill’s front end, where you attach drill bits or screwdriver bits.
- Clutch: Adjusts the torque, providing more control and preventing over-driving or stripping screws.
- Speed Control Trigger: Determines how fast the drill turns, offering control for different drilling tasks.
Types of Cordless Drills
| Feature | Standard Drill/Driver | Hammer Drill | Impact Driver |
|---|---|---|---|
| Design | Has a keyless chuck to hold various drill and driver bits. | Similar to a standard drill but includes a hammering mechanism. | Compact with a collet for hex-shanked driver bits. |
| Primary Function | Drilling holes and driving screws in various materials. | Drilling into hard materials with a hammering action. | Driving screws and bolts with high torque and impact force. |
| Best Suited For | General-purpose DIY tasks, light construction work. | Masonry and concrete drilling, heavy-duty construction tasks. | Heavy-duty screw-driving, large fasteners, tough materials. |
| Torque and Speed | Adjustable speed, sufficient torque for everyday tasks. | Higher torque with hammering action (measured in BPM). | Highest torque, impact mechanism for resistance management. |
Why Cordless?
The main advantage of a cordless drill is its portability. You’re not tethered to the nearest power outlet, which means you can work in remote areas of your home or garden. The advancement in battery technology means these drills are now more powerful and last longer, making them comparable in performance to their corded counterparts.
Choosing the Right Cordless Drill
- Understand the needs:
- DIY Projects: Simple furniture assembly requires less power than building a deck.
- Frequency of use: Occasional use demands different features compared to daily, heavy-duty tasks.
- Consider these features:
- Power (Voltage): Higher voltage means more power. A 12V to 18V drill is usually sufficient for most home DIY tasks.
- Battery Life: Look for lithium-ion batteries for longer life and faster recharging. Consider having a spare battery for uninterrupted work.
- Speed and Torque Settings: Adjustable settings give you more control for different tasks. More torque is beneficial for driving screws into harder materials.
- Weight and Comfort: A lighter drill reduces fatigue. Ergonomic designs and comfortable grips are crucial for prolonged use.
- Chuck Size: Common sizes are ⅜ inch and ½ inch. The larger size allows for bigger drill bits.
- Additional features: LED lights for visibility, belt clips for convenience, and brushless motors for durability are nice extras.
Basic Operations of a Cordless Drill
1. Charging the Battery
- Before using your drill, ensure the battery is fully charged.
- Most cordless drills come with lithium-ion batteries that have a good lifespan and charge quickly.
2. Inserting and Changing Drill Bits
- Open the chuck by rotating it counter-clockwise.
- Insert the drill bit, centering it in the chuck.
- Tighten the chuck by rotating it clockwise until the bit is secure.
- To change bits, reverse the process.
3. Setting the Drill Mode
- Most drills have a switch to select between drilling and driving mode.
- Drilling mode is for making holes; driving mode is for screwing.
4. Adjusting the Clutch
- The clutch controls the torque, preventing over-driving or stripping screws.
- For drilling, set the clutch to the highest number. For driving screws, adjust based on material hardness.
5. Using the Variable Speed Trigger
- The trigger controls the drill speed – the harder you press, the faster it spins.
- Start slowly to establish the hole, then increase speed as needed.
6. Drilling a Hole
- Mark your drilling point.
- Hold the drill steady and perpendicular to the surface.
- Gently press the trigger to start drilling. Apply steady pressure.
- Once through, release the trigger and pull the drill out.
7. Driving a Screw
- Choose the right driver bit for your screws.
- Place the screw on the bit and position it where you want to drive it.
- Apply gentle pressure on the trigger to start driving the screw.
- Release the trigger once the screw is in place.
Drill Bits and Accessories
A cordless drill is only as effective as the bits and accessories you use with it. Understanding the variety of drill bits and selecting the right accessories can significantly enhance your drilling experience.
Understanding Drill Bits
- Types of Drill Bits:
- Twist Bits: Ideal for wood, metal, and plastic. The most common and versatile drill bit.
- Masonry Bits: Used for drilling into brick, stone, or concrete. Recognizable by the arrow-shaped tip.
- Spade Bits: Best for drilling large holes in wood. Features a broad, flat blade.
- Forstner Bits: Perfect for making clean, large holes in wood. Produces a flat-bottomed hole.
- Hole Saws: Used for making large holes, such as for door locks or piping.
- Selecting the Right Bit:
- Material: Choose a bit designed for the material you are drilling into.
- Size: Ensure the bit size matches your drilling requirements.
Additional Drill Accessories
- Drill Bit Sets: Collections of various bits, providing a range of sizes and types for different materials.
- Screwdriver Bit Sets: A selection of driver bits for different types of screws.
- Countersink Bits: For creating a conical opening on top of a hole, allowing screws to sit flush with the material.
- Right-Angle Attachment: Allows drilling in tight or hard-to-reach places.
- Extension Bits: Provide extra length for deeper holes or hard-to-reach areas.
Safety and Best Practices
- Securely Attach Bits: Always ensure the bit is tightly secured in the chuck.
- Match Speed and Pressure: Adjust the drill’s speed and pressure according to the bit and material.
- Use a Pilot Hole: For precise drilling, especially in hard materials, start with a smaller pilot hole.
Maintenance and Safety
Safety While Using a Cordless Drill
- Personal Protective Equipment (PPE):
- Always wear safety glasses to protect your eyes from debris.
- Use ear protection when working for extended periods or with loud materials.
- Proper Handling:
- Maintain a firm grip and control of the drill at all times.
- Ensure your workpiece is securely clamped or held.
- Awareness of Surroundings:
- Be aware of your surroundings, especially when working in high or confined spaces.
- Keep the work area clean and free of trip hazards.
- Battery Safety:
- Use only the charger and battery that came with your drill.
- Never expose batteries to water or extreme temperatures.
- Drilling Tips:
- Start with a lower speed to gain control and prevent the bit from slipping.
- Do not force the drill; let the tool do the work.
- Emergency Preparedness:
- Know how to stop the drill quickly in case of an emergency.
- Keep a first-aid kit accessible in your work area.
Maintenance of Your Cordless Drill
- Regular Cleaning:
- After each use, wipe down the drill to remove dust and debris.
- Use a soft brush or compressed air to clean vents and chuck.
- Battery Care:
- Store batteries in a cool, dry place.
- Avoid leaving them in the charger after they’re fully charged.
- For lithium-ion batteries, it’s okay to charge them even if they’re not fully depleted.
- Lubrication:
- Occasionally lubricate the chuck with a drop of light machine oil.
- Check for Wear and Tear:
- Regularly inspect the drill and bits for signs of wear.
- Replace bits that are dull or damaged.
- Storage:
- Store your cordless drill in a dry, secure place.
- Keep it in a case or hanging on a tool rack.
Key Takeaways
- Plan Ahead: Always start with a clear plan or blueprint for your project.
- Measure Twice, Drill Once: Accuracy is key in DIY projects.
- Pilot Holes: Drill pilot holes to make screwing easier and prevent wood from splitting.
- Safety First: Wear appropriate safety gear and work in a well-lit, ventilated area.


Leave a Reply